Tuesday, January 7, 2014

WHAT IS CELLOPHANE?


Sometimes it is just good to know a little about the products we are using. When I have tried to use plastic wrap in place of cellophane the project usually turns out poorly. Why?  Typically cello has a lot more body and is thicker than plastic wrap, so I quickly gave up trying to improvise with plastic wrap.

Maybe it is easier to start off with what cellophane isn't! Cellophane, which is also known as cello, is not plastic kitchen wrap. Plastic kitchen wrap has been around for about 100 years but gained popularity during WWII as a substitute for aluminum foil which was in short supply at that time. Food grade plastic wrap is thin, clingy, dissolves when placed near a heat source and is usually quite narrow in width.

A little later in history Jacque Brandenberger developed cellophane (early 1900's) in Switzerland. The idea apparently came to him during dinner out at a restaurant when he witnessed a guest spill a glass of wine on the white tablecloth. He thought.... how handy it would be to just wipe up the spill rather than all the commotion of changing linens during dinner. He began working on development of a textile with a clear coating.  Although that endeavor failed, it was the beginning of the transparent layer we now call cellophane which is thicker, full-bodied, not clingy, heat tolerant, and comes in some pretty wide widths.

Dupont perfected Jacque's original cellophane by improving the moisture proofing. True... cellophane may have begun as a product being developed for the food service industry, but it quickly caught on in the packaging industry because of it's bacteria, moisture and grease resistance. Cello keeps products fresher because of its low air permeability. When used as a gift wrapping it provides a layer of clear protection for your decorative paper wrappings, it is a nice filler for gift bags and gift baskets, it is a heat sealable, food safe barrier, that is widely used as the finishing wrap on gift baskets and other gift items.

Amazingly enough cellophane is made from wood and/or cotton pulp...I know...neither of these products are transparent! With further processing, washing and bleaching the finished product that we use today is created. It comes in varying clarity and thickness, and can be purchased on rolls, in sheets and even pre-made cello bags. Cellophane is a biodegradable, eco-friendly product that can be found not only in clear, but also in printed and solid colors.
 
Whitman's candy company was the first to use cellophane to package their candy samplers. We still enjoy using it for packaging candy and much more. 

Some uses for cellophane are.....

   Gift baskets, mugs and bottles

   Gift wrapping

   Floral wrap

   Substitute for tissue paper

   Food safe barrier

   Food packaging

   Protective and/or decorative table covering

   General crafting

Wow! Just noticed that people are wrapping themselves in cellophane during workouts to speed up weight loss. I think I'll pass on this use, but it just goes to show that there ARE many uses for cellophane.


Thursday, October 31, 2013

BELLEWOOD ACRES IN THE FALL!

 
 Shopping Local

BelleWood Acres opened up their new store in Whatcom County last year. Although they have been a family owned orchard since 1996 they ventured out and created this fun store that not only carries their bountiful harvest of apples, but many products that are perfect for gift giving, party planning, cooking and decorating.

 
Fall Decorating
Fresh from the farm! 

Gift Giving 
Specialty butters to fancy up with great gift packaging

 
Soup Mixes
for easy entertaining
 
Now who wouldn't love to receive some delicious, crisp apples as a gift? We have used the single handled produce bag, available at Bellewood Acres free when you purchase your produce, and dressed it up with colored tissue paper, raffia ribbon and a handmade tag. Just a few simple additions and it becomes a gift!
 
 
Here is what we used:
Paper produce bag
Scarlet Red Tissue Paper - 2 sheets 20" x 30"
Matte Raffia Ribbon - red and kraft - 2 yards each color
Handmade tag
and Honey Crisp Apples.

Visit 

Visit store website for more information
http://www.bellewoodfarms.com/
 

Photo credit: Ribbons and Favors.  http://www.ribbonsandfavors.com/

Tuesday, October 8, 2013

INVITES, CHOCOLATE AND CAKE - Sounds Like a Party!

Shopping Local

If you live in Washington's Whatcom County (home turf for Ribbons and Favors) and are planning a small party, or large event we found a trio of gems side by side on the corner of Cornwall and Champion in Downtown Bellingham. It is always a planning bonus when you don't have to drive all over the place for every item and this little corner has three perfect businesses to help you out.

INVITES
 
Spruce Stationery and Design is the newcomer to the group. Complimenting the other two business with customized invites for your wedding, corporate event or personal celebrations. Located at 1422 Cornwall Ave in Bellingham


CHOCOLATE
Chocolate Necessities has total deliciousness for your chocolate gift favors. Their truffles and chocolates all begin with pure Belgium Callebaut chocolate. Located at 1424 Cornwall Ave. in Bellingham.


CAKE
Pure Bliss Desserts with their amazing "made from scratch" baked creations. They will prepare baked goods for your sensational event or create a spectacular wedding cake for your special day. Cake sampling for your event is available by appointment.


Visit store websites for more information.
 
 
Photo Credit - Ribbons and Favors http://www.ribbonsandfavors.com/


Sunday, October 6, 2013

COOKIE DELIVERY!

Beautiful gifting of homemade cookies is a snap when you keep the right packaging supplies on hand. If you like to bake and take the opportunity to share your talent and delicious results with others, package your cookies in pretty boxes for the final touch. When you purchase delicious baked treats from a bakery the best bakers always package the order in a bakers box and tie it up with bakers twine, or seal the box shut with an attractive label. You put in the work of a Pastry Chef why not add pretty packaging like a pro, especially when it is so simple.


 SUPPLIES
6" x 6" x 4" Gourmet Favor Box
20" x 30" Tissue Paper
10" Gold Stretch Loop
Wax Paper

We have used a 6" x 6" x 4" Brown Ivory Stripe Favor Box, 20" x 30" sheet of Candy Dots Tissue Paper, 10" Gold Stretch Loop from Ribbons and Favors for our project. Wax paper is used for our food safe barrier and 25 homemade Butterscotch Oatmeal Cookies (recipe below) fit nicely.

STEP 1
Assemble favor box, fold printed tissue paper in half so your finished folded size is 15" x 20". Tuck tissue paper into the box first, then line the bottom and sides with a piece of waxed paper.

STEP 2
Add your delicious cookies. We fit 25 into the box.


STEP 3
Tuck tissue paper across the top of the cookies. Put the assembled lid on the favor box base, then slip the 10" Stretch Loop around the box. You can add a handmade tag or adhesive label if you wish.  


BUTTERSCOTCH OATMEAL COOKIES

1 1/2 cup butter
2 cup packed brown sugar
1 cup granulated sugar
2 teaspoons baking powder
1/2 teaspoon baking soda
4 eggs
2 teaspoons vanilla
3 1/2 cups all purpose flour
4 cups rolled oats
2 - 11 oz packages butterscotch flavored chips

In a large mixing bowl beat butter with an electric mixer on medium to high speed until soft and smooth. Add brown sugar, granulated sugar, baking powder and baking soda. Beat until combined, scraping sides of bowl occasionally. Beat in eggs and vanilla until combined. Beat in as much of the flour as you can with mixer. If your mixer begins to stall as the batter becomes heavy, hand mix the rest of the flour. Stir in rolled oats and butterscotch chips.

Drop by rounded teaspoons 2 inches apart on an ungreased cookie sheet. Bake at 375 degrees for 10 to 12 minutes or until edges are golden brown. Cool cookies on wire rack. Makes about 80 cookies. Ingredients can be cut in half for a smaller batch.   Enjoy ~ Sandra

Ribbons and Favors Shopping List

Thursday, September 12, 2013

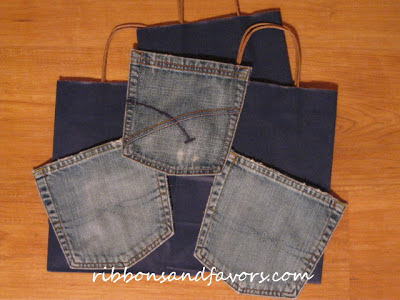
DENIM POCKET GIFT BAGS

Create this casual western style embellishment on a Solid Kraft Shopping Style gift bag. If you happen to be a back pocket hoarder like me (weird I know) you will have no trouble finding pockets to create you very own version of this bag. If you haven't been saving pockets from worn out jeans, now you have a reason to begin. Heck...you can even use the welted seam from the leg of the jeans for a ribbon. Currently bling and fancy embroidery on jean pockets is very popular. I can hardly wait to see a gift bag done up with one of these fancy pockets. Don't know if I can wait for the jeans to wear out. Colored jeans are all the rage this year which will open up a whole new selection of pockets to coordinate with the Solid Color Shopping Style gift bags.


Supplies
Jeans (with back pockets)
Navy Blue Kraft Gift Bag
1 Sheet Red Bandana Tissue Paper
2 Sheets Solid Red Tissue Paper

Tools: scissors, hot glue, hot glue gun


Step 1
Cut the pockets out of the jeans keeping the scissors as close as possible to the outer edge of the pocket face.  Leave the fabric on the back of the pocket intact.


Step 2
Run a bead of hot glue around the edge of the pocket on the wrong side. Place it right side up on the front of your gift bag.  Keep in mind what you plan on putting in the pocket to help you determine the pocket placement on the gift bag. We have used an XL KitKat bar and a pocket from adult size jeans, so my pocket was centered on the gift bag and placed 1" from the bottom of an 11" bag.


Step 3
Cut a sheet of Bandana Tissue Paper into quarters (should measure approximately 10" x 15" after cutting).  Tuck Bandana Tissue into pocket behind candy in pocket and arrange.  Add Solid Red Tissue Paper to the top of the bag.

Tips: Add details with Red Matte Raffia tied to the handle in a shoelace style bow, or tie up a Matte Raffia bow and hot glue it onto the pocket.  Create spa themed gift bags, sports themed, a candy shop or bake shop bag, a pet theme, teen theme...oh my...the list could go on and on. I'll stop and let you take over! 


Ribbons and Favors Shopping List
Navy Shopping Style Gift Bags, Red Bandana Tissue Paper 20" x 30",
Solid Red Tissue Paper 20" x 30", Matte Raffia

Tuesday, August 27, 2013

JUST US CHICK'S YELLOW FAVOR BOXES

We have used the recipe for our SALTY SWEET FAVOR TREATS featured in the previous post for this Chick Themed Favor. Using only the yellow M&M's for a tasty chocolate yolk in keeping with our themed favor. When you add this simple favor packaging treatment your delicious filler, instantly becomes a beautiful baby shower favor, or wedding shower favor.


Supplies
Natural Kraft Favor Box 3"x3"x2"
Dandelion Yellow Tissue Paper 15"x20"
Sunshine Yellow Curling Ribbon 3/16"
Daffodil Yellow Classic Star Bow
Ribbon Shredder
Quantities will be determined by the number of favors you are doing.

STEP 1
Cut 2 strips of Dandelion Yellow Tissue Paper measuring 3" x 10" lay the two strips of tissue in a crisscross inside the box as a liner,  add 12 Salty Sweet Favor Treats, fold tissue paper ends lightly over the filler. Tuck the flap of the box in
 
STEP 2 
Cut 2 yards of Sunshine Yellow Curling Ribbon, wrap around the box in a traditional crisscross style. Tie the ends in a knot on the top of the box.  Fasten a 3-3/4" Daffodil Yellow Classic Star Bow on top.  Shred the loose ends of the curling ribbon with your Ribbon Shredder and curl.


Keeping it classy and still using a fun theme!
 

Tuesday, August 20, 2013

SALTY SWEET FAVOR TREATS

This is a terrific recipe because it really is just so simple and tasty. Not willing to take the word of just the hubby we had a very willing group of taste testers also critic them, and the voting was unanimous. This favor treat was a winner! The cost per tasty morsel was just pennies per piece.

Ingredients:
Pretzel Wafers
Hershey Hugs (approx. 80 pieces to a 12oz package)
Plain M&M's
 
Preheat oven to 180 degrees (oven temperatures vary so watch your first batch closely)
Unwrap Hugs and place Pretzel Wafers on waxed paper lined cookie sheet.

 
Place Hugs in the center of the Pretzel Wafers and put into the oven for 5 minutes.
 
Remove from oven when the base of the Hugs are soft and just starting to collapse. Press M&M into the center of the warm chocolate.
Chill for 1 hour in fridge, or 20 minutes in freezer.
 
Now you are ready to package them up for gifting!
 
A few helpful hints:
  • I purchased a 19.20 oz package of M&M's which was way too much (although left over M&M's are not really a bad thing).
  • Once the group had taste tested they were coming up with lots of alternate suggestions like using Rolo's in place of the Hugs, or Almond Kisses with an almond sliver on top. It may seem the possibilities could be endless. Have fun with this one!