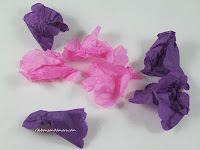
Did your Mom or Grandma save wrapping paper? Mine did. She carefully flattened out the fancy wrapping paper that came off gifts, requesting that we try not to tear the paper, which we would have much preferred to do in our hurry to the good part, but instead she wanted us to carefully open it at the seams and lay the paper aside. She would then flatten out the fancy wrap, carefully fold it and save it to be re-used on a smaller sized gift.
We may laugh at this old fashioned frugality, but guess what, the modern day guru's of recycling are touting this as a great way to re-use, re-purpose, recycle, be green and eco-friendly. Over 4 million tons of gift wrap and gift bags reach the nations landfills each year! That's a lot of paper that we could have some fun with. It is also a good reason to purchase good quality gift bags that can stand up to many uses.
So here is a quick and easy project to make use of used tissue papers, gift wrap, newspaper and even book or magazine pages.
SUPPLIES
Paper
Punches
Brass Head Fasteners (1/2" long)
We have used pre-used tissue paper for our project, a 2" scalloped round punch, a 2-3/8" blossom punch and plain brass fasteners from our local office supply store. Tools: awl (for piercing the papers)
STEP 1
Punch design from your paper. You can use as many layers of paper as you wish, we typically use at least 6, often more for a fuller flower. You can combine colors, use all one color or even combine prints and weights of papers. We have punched 4 scallop rounds (top layers) and 3 blossom (bottom layers).
STEP 2
Stack punched designs on top of each other and pierce the center of the stack with your awl, or the sharp end of a geometry compass works also. Remove stack from piercing tool.
STEP 3
Crumple up the punched layers. Then gently uncrumple and slip the fastener through the center of the pierced layers. Pry open the tines on the back of fasteners and press flat against the back of the flower pieces. Create your 3D flower by re-crumpling and arranging the layers to cover the fastener (if desired) and fanning them out all the way to the bottom layer.
Finished flower
TIPS: When using pre-used papers for this project the punched edges are often not as clean as when you use new papers. For this application we don't mind that edges are often not as perfect, but if you need a crisp outer edge we suggest using new paper products.
You can use fancy paper crafting brads in place of the plain brass fasteners and leave the center a little more open so it can be seen.
Enjoy ~ Sandra


No comments:
Post a Comment
Comments welcome!